前言 开个坑,最近看的Vuex@next(4.0)的源码,源码不复杂,可以拿出来写写
当作一个笔记,如果帮助到你理解了,那么我会相当开心😘
源码不是很复杂,文件也不多,但是我感觉写的小巧,很棒
应该会分成几个帖子来写,主要按照每个文件来写,如果有更好地编写方式,可以留言给我,因为对我来说,分文件写起来有条例以及可以循序渐进
Vuex,是Vue官方的一个全局状态管理,可以理解成一个全局的data(类似组件里面的data属性)
Vuex也有暴露一些自己的方法,比如类似组件的计算属性(getter),同步的修改数据操作(mutation),支持异步方式修改数据的操作(action)
个人觉得,如果想要理解源码,最好是先读它的API,知道了它的API是干什么的,看起源码来才能更好地理解
应该会分成几个部分来写
store.js 入口文件,创建一个store的核心文件module-colleton.jsregister)(卸载(unregister))一个模块,嵌套模块module.js 模块对象,每个模块的对象类helper.js 工具函数,比如mapGetters,mapMutations等等
Vuex@next(4.0)仓库 Vuex@next(4.0)文档仓库
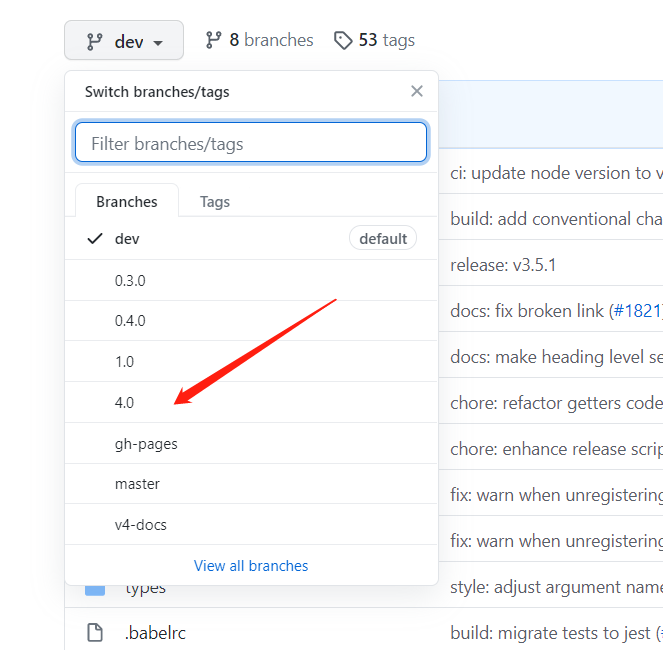
PS:如果直接搜索记得切换分支!!!如下图
vuex.vuejs.org的文档还是Vuex3的,不过Vuex4暴露的API和Vuex3的基本一样
所以如果想了解API的作用看Vuex3的文档问题不大
如果想看用例的,就取上面的文档仓库上找对应API的MD文件即可
也可以及直接 点我 就可以看到几乎全部的API了
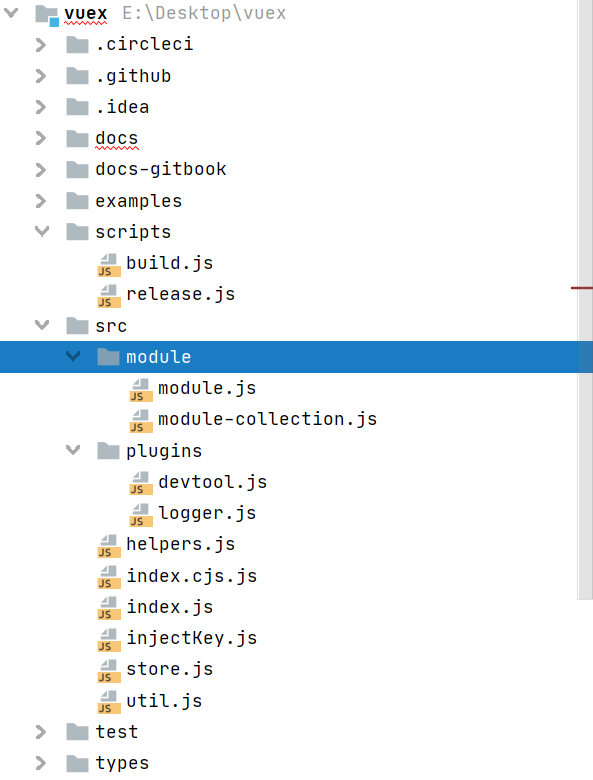
Vuex的项目结构不复杂(PS:报红的原因是我没有安装依赖)
So,我还是有信心讲好的~ ok,那么我们开始吧~~
store.js本篇主要讲建立一个store的整体流程。
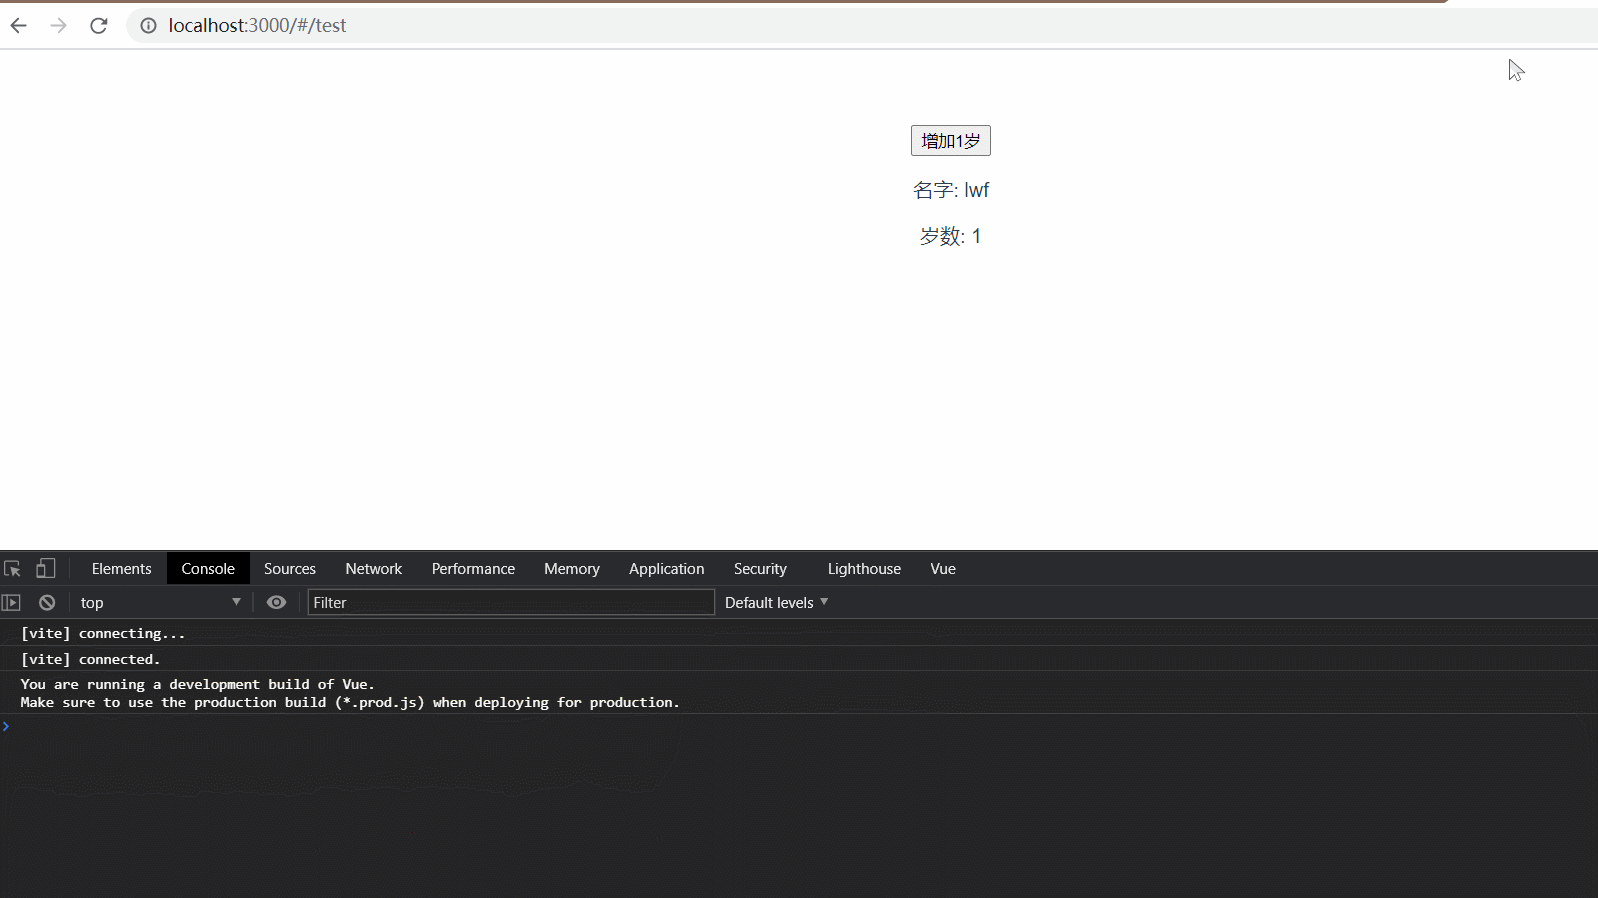
由于在Vue3中开始推行setup函数来进行逻辑的编写,有一点ReactHook的味道,比如
1 2 3 4 5 6 7 8 9 10 11 12 13 14 15 16 17 18 19 20 21 22 23 24 25 26 27 28 <template > <div > <button @click ="ageIncrementHandler" > 增加1岁</button > <p > 名字: {{ person.name }}</p > <p > 岁数: {{ person.age }}</p > </div > </template > <script > import { reactive } from 'vue' export default { name : 'Test' , setup ( const person = reactive ({ name : 'lwf' , age : 1 , }) const ageIncrementHandler = ( person.age ++ } return { person, ageIncrementHandler, } }, } </script >
运行效果如下
在Vuex3中,也有一点这种味道,我觉得主要体现在创建store上
Vuex3创建store
1
2
3
const store = new Vuex .Store ({ })
到了Vuex4,创建store改为函数式创建
1 2 3 4 const store = createStore ({ })
这其中难道有什么魔法???
其实并没有,在store.js中可以看到createStore的源码
1
2
3
export function createStore (options ) { return new Store (options) }
无非是包了一层函数导出而已
Vuex4在设计时兼容了Vuex3,在4.0的仓库的README.md中的起始部分可以看到如下描述
This is the Vue 3 compatible version of Vuex. The focus is
大意就是Vuex4兼容了Vuex3,暴露了和Vuex3相同API,使得在旧的Vuex代码可以使用在Vue3上。
真正的核心代码为下面的Store类
1
2
3
4
5
6
7
8
9
10
11
12
13
14
15
16
17
18
19
20
21
22
23
24
25
26
27
28
export class Store { constructor (options = {} ) {} install (app, injectKey ) {} get state () {} set state (v ) {} commit (_type, _payload, _options ) {} dispatch (_type, _payload ) {} subscribe (fn, options ) {} subscribeAction (fn, options ) {} watch (getter, cb, options ) {} replaceState (state ) {} registerModule (path, rawModule, options = {} ) {} unregisterModule (path ) {} hasModule (path ) {} hotUpdate (newOptions ) {} _withCommit (fn ) {} }
这里省略了实现的代码,为了从宏观上去认识这个类
install1 2 3 4 5 6 export class Store { install (app, injectKey ) { app.provide (injectKey || storeKey, this ) app.config .globalProperties .$store = this } }
安装函数很简单
通过Vue3的provideAPI注入了自身,并且把自身挂载到app.config.globalProperties的$store上
provide注入,这样在setup函数中就可以使用useStore(Vuex4暴露的API)来获取store对象,注意:在setup函数中没有this!!!
globalProperties挂载,使得Vue2的方式中可以通过this来获取store,这种方法取代了Vue2的Vue.prototype.propertyName = value,比如之前想挂载经过axios封装的API层,一般如下写
1 2 3 import http from './http' Vue .prototype $http = http
然后在组件中
1
2
3
4
5
6
export default { mounted ( console .log (this .$http ) }, }
而在Vue3中,只需要挂载到app.config.globalProperties即可有相同的效果
1 2 3 4 5 import http from './http' const app = createApp (App )app.config .globalProperties .$http = http app.mount ('#app' )
state的get,set函数我们知道,Vuex不允许我们直接更改state状态,必须通过commit一个mutation
或者dispatch一个action来更改状态
从它源码可以看出,state属性不是真正存放状态的地方,只是对外暴露的一个接口,通过定义get和set来限制用户的行为
1 2 3 4 5 6 7 8 9 10 export class Store { get state () { return this ._state .data } set state (v ) { if (__DEV__) { assert (false , `use store.replaceState() to explicit replace store state.` ) } } }
可以看到get返回了真正的状态的一个属性,位于_state.data
而set则直接报错(开发模式__DEV__下),提醒用户不要直接修改状态,而是要使用replaceState这个函数来修改状态。
比如我们创建了下面这样的store
1 2 3 4 5 6 const store = createStore ({ state : { name : 'lwf' , age : 22 , }, })
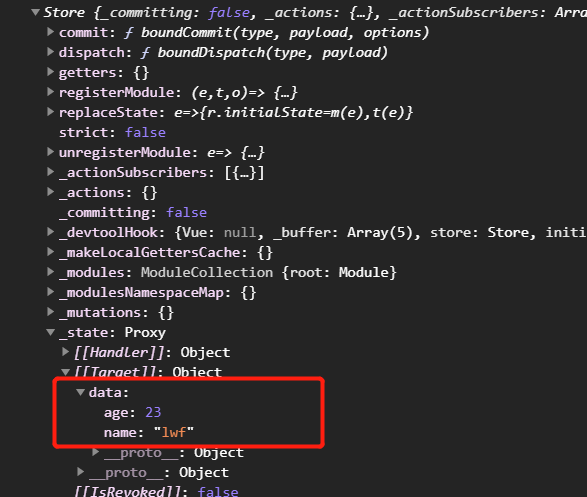
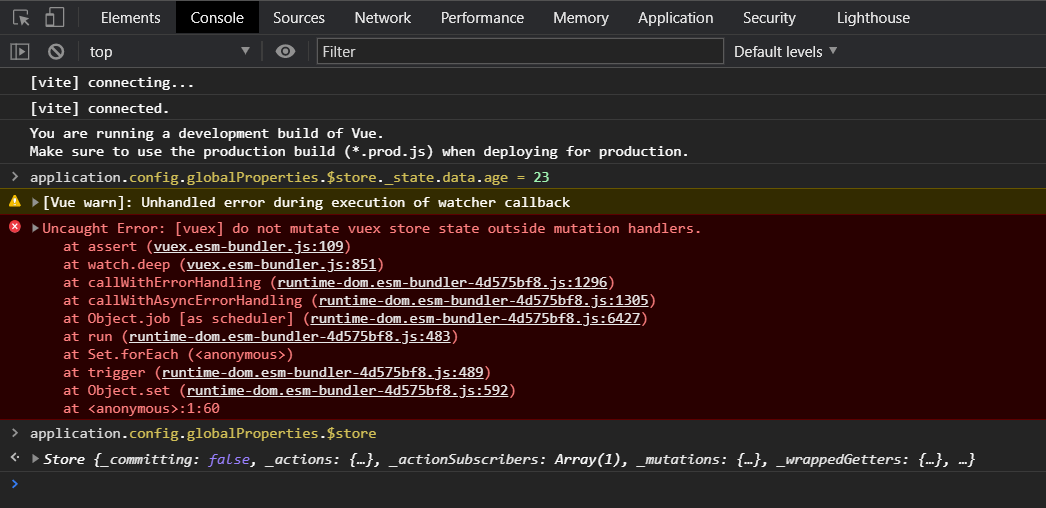
可以打印下store,确实出现了_state.data,并且是一个Proxy对象(其实这是一个响应式的对象,后面会写到)
当然可以直接的修改这个对象,并不会出现什么错误,我们直接修改_state.data
1 2 3 4 5 6 7 8 store._state .data .age = 23
这里要注意,set只是对设置state这个操作拦截
而无法递归的拦截,所以store.state.age = 23从逻辑上并不会执行state的set,而是执行state的get
打印看看
发现确实改变,也没有出现任何错误(这里没报错是因为默认情况下严格模式是关闭的)
当然这样子修改状态是不应该出现在实际的代码中的,因为这会使得状态的改变变得混乱。
constructor新建一个store时的初始化过程
1 2 3 4 5 6 7 8 9 10 11 12 13 14 15 16 17 18 19 20 21 22 23 24 25 26 27 28 29 30 31 32 33 34 35 36 37 38 39 40 41 42 43 44 45 46 47 48 49 50 51 52 53 54 55 56 57 58 59 export class Store { constructor (options = {} ) { if (__DEV__) { assert (typeof Promise !== 'undefined' , `vuex requires a Promise polyfill in this browser.` ) assert (this instanceof Store , `store must be called with the new operator.` ) } const { plugins = [], strict = false , } = options this ._committing = false this ._actions = Object .create (null ) this ._actionSubscribers = [] this ._mutations = Object .create (null ) this ._wrappedGetters = Object .create (null ) this ._modules = new ModuleCollection (options) this ._modulesNamespaceMap = Object .create (null ) this ._subscribers = [] this ._makeLocalGettersCache = Object .create (null ) const store = this const { dispatch, commit } = this this .dispatch = function boundDispatch (type, payload ) { return dispatch.call (store, type, payload) } this .commit = function boundCommit (type, payload, options ) { return commit.call (store, type, payload, options) } this .strict = strict const state = this ._modules .root .state installModule (this , state, [], this ._modules .root ) resetStoreState (this , state) plugins.forEach ((plugin ) => plugin (this )) const useDevtools = options.devtools !== undefined ? options.devtools : true if (useDevtools) { devtoolPlugin (this ) } } }
最前面的两个assert判断表明Vuex需要Promise支持以及必须通过new来创建
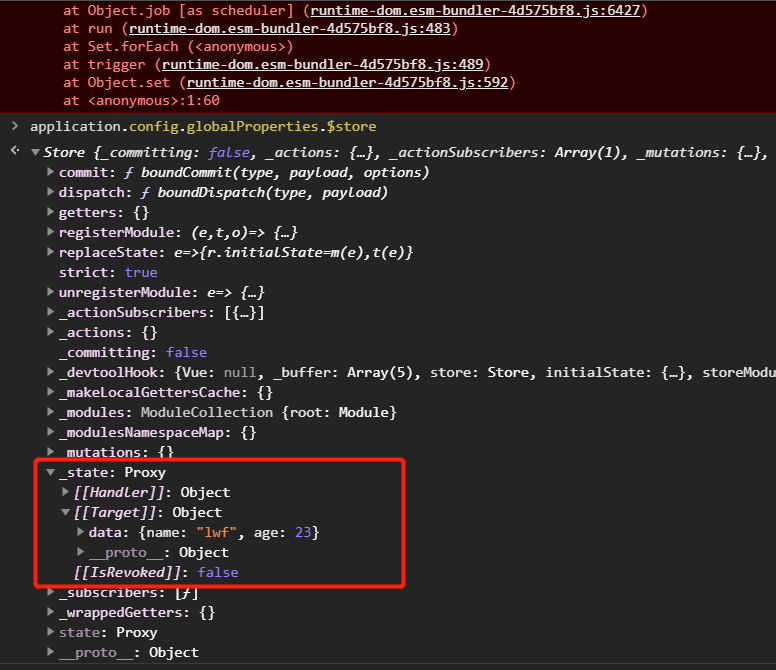
可以看到初始化了很多的属性
strict 严格模式的开启标志_committing 跟严格模式相关,使得即使开启严格模式下也可以修改状态_state.data_actions 存放所有的action_actionSubscribers 存放所有的注册action回调函数_mutations 存放所有mutation_subscribers 存放所有的注册mutation回调函数_wrappedGetters 存放所有的绑定参数的getter_modules 嵌套的模块列表_modulesNamespaceMap 带命名空间的模块列表_makeLocalGettersCache 带命名空间的模块的所有getter的缓存
在初始化了属性之后,绑定了dispatch和commit的context
1 2 3 4 5 6 7 8 const store = this const { dispatch, commit } = this this .dispatch = function boundDispatch (type, payload ) { return dispatch.call (store, type, payload) } this .commit = function boundCommit (type, payload, options ) { return commit.call (store, type, payload, options) }
为啥要这样写呢,原因就是如果我们把对象的函数赋值给一个变量,那么此时的this会丢失,比如
1 2 3 4 5 6 7 8 9 10 const o = { name : 'lwf' , say ( console .log (this .name ) }, } o.say () const say = o.say say ()
绑定了上下文,这样用户如果使用解构之类的操作,也不会造成上下文的丢失
1 2 3 4 const { dispatch, commit } = store;commit (...) dispatch (...)
然后初始化了strict严格模式标志,并且严格模式默认不开,从对options的解构可以看出,strict的默认值为false
1 2 3 4 5 6 7 8 const { plugins = [], strict = false , } = options this .strict = strict
对于严格函数,可以先看enableStrictMode这个函数(注意,这个函数不在类中,同一个文件内往下拉可以找到)
1 2 3 4 5 6 7 8 9 10 11 function enableStrictMode (store ) { watch ( () => store._state .data , () => { if (__DEV__) { assert (store._committing , `do not mutate vuex store state outside mutation handlers.` ) } }, { deep : true , flush : 'sync' }, ) }
可以看到这个函数内部使用了Vue3的watchAPI
监听了store._state.data这个对象,配置为deep(深层监听)并且执行为sync(同步的)
在回调函数内部,开发模式__DEV__下会根据store._committing状态来判断是否要抛出错误
我们可以试试配置下strict为true,然后打印来看看效果
1 2 3 4 5 6 7 8 const store = createStore ({ strict : true , state : { name : 'lwf' , age : 22 , }, }) store._state .data .age = 23
报错了,但数据还是更改了(所以还是要根据Vuex的设计理念来,而不是直接修改数据)
有一个函数和enableStrictMode存在关系,就是在这个类中的_withCommit方法
1 2 3 4 5 6 7 8 9 10 11 export class Store { _withCommit (fn ) { const committing = this ._committing this ._committing = true fn () this ._committing = committing } }
可以看到,这个函数使得内部修改_state.data不报错(即使在严格模式下,不过现在还没写到它在什么地方开启)
因为_committing被置为true
接着执行了两个函数installModule和resetStoreState
1 2 3 const state = this ._modules .root .state installModule (this , state, [], this ._modules .root )resetStoreState (this , state)
在installModule上有一行注释
init root module.this also recursively registers all sub-modules and
大意就是,初始化根模块,递归注册所有子模块,收集所有模块的getters到_wrappedGetters下
在resetStoreState上有一行注释
initialize the store state, which is responsible for the reactivity
大意就是,初始化store的状态,通过reactiveAPI使之成为响应式的(reactive)
并且也会注册wrappedGetters里面的所有getter到store.getter下,使之成为一个计算属性(computed)。
(这两个函数后面写,先认识总体的流程,如果想查看,点击右侧相应的部分即可跳转)
遍历插件数组,安装插件
1 2 plugins.forEach ((plugin ) => plugin (this ))
对于插件的安装,并没有什么魔法,传入了自己作为参数,然后执行,仅此而已。
Vuex的文档上给了一个简单的例子
1 2 3 4 5 6 7 const myPlugin = (store ) => { store.subscribe ((mutation, state ) => { }) }
内部自带的logger.js也是通过这种方式进行安装,文件位于plugins文件夹下
1 2 3 4 5 6 7 export function createLogger ( return (store ) => { } }
最后是判断是否安装开发工具插件的代码(这个插件依赖了调试工具暴露的对象,实现其实非常简单,但这里忽略不写,因为和核心实现没有太大关系)
1 2 3 4 5 const useDevtools = options.devtools !== undefined ? options.devtools : true if (useDevtools) { devtoolPlugin (this ) }
commitcommit用于提交一个mutation
1 2 3 4 5 6 7 8 9 10 11 12 13 14 15 16 17 18 19 20 21 22 23 24 25 26 27 28 29 30 31 export class Store { commit (_type, _payload, _options ) { const { type, payload, options } = unifyObjectStyle (_type, _payload, _options) const mutation = { type, payload } const entry = this ._mutations [type] if (!entry) { if (__DEV__) { console .error (`[vuex] unknown mutation type: ${type} ` ) } return } this ._withCommit (() => { entry.forEach (function commitIterator (handler ) { handler (payload) }) }) this ._subscribers .slice () .forEach ((sub ) => sub (mutation, this .state )) if (__DEV__ && options && options.silent ) { console .warn ( `[vuex] mutation type: ${type} . Silent option has been removed. ` + 'Use the filter functionality in the vue-devtools' , ) } } }
unifyObjectStyle对入参进行标准化
1 2 const { type, payload, options } = unifyObjectStyle (_type, _payload, _options)
unifyObjectStyle规范了参数,在Vuex中,commit一个mutation的方式有多种,比如
1 2 3 4 5 6 7 8 9 10 11 12 13 14 15 16 17 store.commit ( 'mutation1' , { }, {}, ) store.commit ( { type : 'mutation1' , }, {}, )
unifyObjectStyle实现如下
1 2 3 4 5 6 7 8 9 10 11 12 13 function unifyObjectStyle (type, payload, options ) { if (isObject (type) && type.type ) { options = payload payload = type type = type.type } if (__DEV__) { assert (typeof type === 'string' , `expects string as the type, but found ${typeof type} .` ) } return { type, payload, options } }
如果第一个参数是对象,那么第二个参数就应该是options,mutation的名字应该为第一个参数的type,载荷就是第一个参数。
如果第一个参数不是对象,那么就是三个参数的情况,直接返回即可
注意到中间还判断了mutation的名字一定要是字符串,不然报错
接着从_mutations属性中拿出了对应type的函数数组
是一个数组,也就是说一个名字为m1的mutation是可以对应多个函数的
1 2 3 4 5 6 7 8 9 const mutation = { type, payload }const entry = this ._mutations [type]if (!entry) { if (__DEV__) { console .error (`[vuex] unknown mutation type: ${type} ` ) } return }
然后执行了_withCommit来修改状态(防strict为true下报错)
对每个mutation传入了载荷(自定义的参数),注意这里是一个完全同步执行的过程
1 2 3 4 5 this ._withCommit (() => { entry.forEach (function commitIterator (handler ) { handler (payload) }) })
然后进行回调的执行
1 2 3 this ._subscribers .slice () .forEach ((sub ) => sub (mutation, this .state ))
注意这里调用了slice返回了一个浅复制的副本
这么做为了防止在注册的函数中执行取消注册而造成的逻辑混乱问题(Redux内部也有相似的逻辑)
最后一个判断和开发工具相关,忽略
dispatchdispatch用于分发一个action
1 2 3 4 5 6 7 8 9 10 11 12 13 14 15 16 17 18 19 20 21 22 23 24 25 26 27 28 29 30 31 32 33 34 35 36 37 38 39 40 41 42 43 44 45 46 47 48 49 50 51 52 53 54 55 56 57 58 59 60 61 export class Store { dispatch (_type, _payload ) { const { type, payload } = unifyObjectStyle (_type, _payload) const action = { type, payload } const entry = this ._actions [type] if (!entry) { if (__DEV__) { console .error (`[vuex] unknown action type: ${type} ` ) } return } try { this ._actionSubscribers .slice () .filter ((sub ) => sub.before ) .forEach ((sub ) => sub.before (action, this .state )) } catch (e) { if (__DEV__) { console .warn (`[vuex] error in before action subscribers: ` ) console .error (e) } } const result = entry.length > 1 ? Promise .all (entry.map ((handler ) => handler (payload))) : entry[0 ](payload) return new Promise ((resolve, reject ) => { result.then ( (res ) => { try { this ._actionSubscribers .filter ((sub ) => sub.after ) .forEach ((sub ) => sub.after (action, this .state )) } catch (e) { if (__DEV__) { console .warn (`[vuex] error in after action subscribers: ` ) console .error (e) } } resolve (res) }, (error ) => { try { this ._actionSubscribers .filter ((sub ) => sub.error ) .forEach ((sub ) => sub.error (action, this .state , error)) } catch (e) { if (__DEV__) { console .warn (`[vuex] error in error action subscribers: ` ) console .error (e) } } reject (error) }, ) }) } }
dispatch的参数传入方式和commit基本一样,所以函数前面的逻辑也是规范参数,提取相应的部分
然后调用了那些注册的before的函数,这里用try-catch,防止before函数执行出现错误导致后续dispatch操作执行失败
1 2 3 4 5 6 7 8 9 10 11 try { this ._actionSubscribers .slice () .filter ((sub ) => sub.before ) .forEach ((sub ) => sub.before (action, this .state )) } catch (e) { if (__DEV__) { console .warn (`[vuex] error in before action subscribers: ` ) console .error (e) } }
对于注册在action的回调,有三种方式来执行回调
1 2 3 4 5 6 7 8 9 store.subscribeAction (() => { }) store.subscribeAction ({ before : () => {}, after : () => {}, error : () => {}, })
所以上面的 .filter(sub => sub.before)逻辑把before的函数给筛了出来
注意这里也做了一个slice浅拷贝,防止函数执行过程中取消注册(或者说是“取消订阅”)
1 2 const result = entry.length > 1 ? Promise .all (entry.map ((handler ) => handler (payload))) : entry[0 ](payload)
然后执行了相应的action函数,这里和mutation一样,都是执行了一个数组,也就是存在多个的action
这里可能有疑问,为啥多个action函数的时候就包了一层Promise.all,一个的时候就没有呢?
这是因为在注册action的时候(registerAction这个函数,后面会写到它的实现),已经对action进行包装了,使得每个action一定会返回一个Promise
最后返回了一个Promise
1 2 3 4 5 6 7 8 9 10 11 12 13 14 15 16 17 18 19 20 21 22 23 24 25 26 27 28 29 30 return new Promise ((resolve, reject ) => { result.then ( (res ) => { try { this ._actionSubscribers .filter ((sub ) => sub.after ) .forEach ((sub ) => sub.after (action, this .state )) } catch (e) { if (__DEV__) { console .warn (`[vuex] error in after action subscribers: ` ) console .error (e) } } resolve (res) }, (error ) => { try { this ._actionSubscribers .filter ((sub ) => sub.error ) .forEach ((sub ) => sub.error (action, this .state , error)) } catch (e) { if (__DEV__) { console .warn (`[vuex] error in error action subscribers: ` ) console .error (e) } } reject (error) }, ) })
action和mutation的不同之处就是action里面支持异步的操作,而mutation里面修改state一定是同步的
所以dispatch返回了一个Promise,在action执行完毕可以通过then注册一个回调
1 2 3 dispatch ('action1' ).then (() => { })
dispatch返回的Promise很简单,根据action返回的Promise状态来决定如何解决dispatch返回Promise的状态
成功回调执行了注册为after的函数,错误回调执行了注册error的函数
简单点讲,就是包了一层Promise,为了能够执行注册的after和error函数(3.4.0版本新增的API)
subscribe注册在mutation执行之后执行的函数
1 2 3 4 5 export class Store { subscribe (fn, options ) { return genericSubscribe (fn, this ._subscribers , options) } }
可以看到,实现依赖了另一个函数genericSubscribe,注册mutation和action都依赖了这个函数
1 2 3 4 5 6 7 8 9 10 11 function genericSubscribe (fn, subs, options ) { if (subs.indexOf (fn) < 0 ) { options && options.prepend ? subs.unshift (fn) : subs.push (fn) } return () => { const i = subs.indexOf (fn) if (i > -1 ) { subs.splice (i, 1 ) } } }
先判断函数fn是否已经在subs中了,不存在才放进去
options的prepend可以指定怎么把函数放到数组中
如果prepend为true,那么执行unshift放到数组头部,反之push到数组尾部
返回了一个函数,这个函数逻辑也很简单,就是找到数组里面的这个函数,然后通过splice删除,也就是取消注册(取消订阅)
subscribeAction注册一个函数,在action执行之前before(默认),执行之后after和执行出错error时执行
1 2 3 4 5 6 export class Store { subscribeAction (fn, options ) { const subs = typeof fn === 'function' ? { before : fn } : fn return genericSubscribe (subs, this ._actionSubscribers , options) } }
可以看到先判断第一个参数是否为函数来判断是否包装为一个对象
如果直接传入了一个函数,也就是typeof fn === 'function'为真,那么包装成一个{ before: fn }
并且也支持options的prepend来配置前插入还是后插入数组
genericSubscribe的实现在subscribe有写,这里就不重复了
watch1 2 3 4 5 6 7 8 export class Store { watch (getter, cb, options ) { if (__DEV__) { assert (typeof getter === 'function' , `store.watch only accepts a function.` ) } return watch (() => getter (this .state , this .getters ), cb, Object .assign ({}, options)) } }
watch的实现依赖了Vue3的watchAPI,做了个简单的入参判断,来对状态进行监听以及执行传入回调,options和Vue3的watch配置一样
replaceState这个API官方给的信息太少,就一句
替换 store 的根状态,仅用状态合并或时光旅行调试。
1 2 3 4 5 6 7 export class Store { replaceState (state ) { this ._withCommit (() => { this ._state .data = state }) } }
实现非常的简单,就是包在_withCommit中执行,替换state而已
一般为了在刷新时恢复状态使用,在beforeunload事件中把状态序列化为字符串(JSON.stringify)存入localStorage中
然后在加载之后判断localStorage是否存在,存在就使用这个函数来替换状态。
个人觉得很少会使用到这个API…
因为如果是上面的情况,为什么不在创建store之前就构建传入createStore的参数呢?
registerModule注册一个动态模块
1 2 3 4 5 6 7 8 9 10 11 12 13 14 15 export class Store { registerModule (path, rawModule, options = {} ) { if (typeof path === 'string' ) path = [path] if (__DEV__) { assert (Array .isArray (path), `module path must be a string or an Array.` ) assert (path.length > 0 , 'cannot register the root module by using registerModule.' ) } this ._modules .register (path, rawModule) installModule (this , this .state , path, this ._modules .get (path), options.preserveState ) resetStoreState (this , this .state ) } }
可以看到,注册的逻辑是由_modules.register实现,注册完之后通过installModule安装对应的module
然后执行resetStoreState来重置store来更新getters
在Vuex中,在初始化设置的模块,可以理解为静态模块,这种模块无法删除
在运行过程中可以动态的注入一个模块,这种模块可以理解为动态模块,动态模块支持删除
这两者底层实现就是用一个runtime来判断,runtime为false表示静态的模块,反之为动态模块(这个之后会写)
而且通过入参可以看出,注册一个模块,是传入一个path数组的,比如现在有如下store
1 2 3 const store = createStore ({ state : {}, })
现在想在根下面注册一个名为m1的模块,那么应该执行
1 2 3 4 5 store.registerModule (['m1' ], { state : {}, getters : {}, })
然后想在m1下面注册一个m2模块
1 2 3 4 5 store.registerModule (['m1' , 'm2' ], { state : {}, getters : {}, })
unregisterModule卸载一个动态的模块,对于初始化的模块,是无法卸载的
1 2 3 4 5 6 7 8 9 10 11 12 13 14 15 16 export class Store { unregisterModule (path ) { if (typeof path === 'string' ) path = [path] if (__DEV__) { assert (Array .isArray (path), `module path must be a string or an Array.` ) } this ._modules .unregister (path) this ._withCommit (() => { const parentState = getNestedState (this .state , path.slice (0 , -1 )) delete parentState[path[path.length - 1 ]] }) resetStore (this ) } }
可以看到,卸载的主要实现也是_modules.unregister
然后通过getNestedState查找对应的父状态,然后使用delete操作删除。
最后重置了store,这个resetStore包括了resetStoreState操作,后面会写到
hasModule判断模块名字是否被注册了
1
2
3
4
5
6
7
8
9
10
11
export class Store { hasModule (path ) { if (typeof path === 'string' ) path = [path] if (__DEV__) { assert (Array .isArray (path), `module path must be a string or an Array.` ) } return this ._modules .isRegistered (path) } }
可以看到实现也是依赖_modules.isRegistered,做了简单的判断
内部函数 installModule安装模块,递归的安装它的子模块。
1 2 3 4 5 6 7 8 9 10 11 12 13 14 15 16 17 18 19 20 21 22 23 24 25 26 27 28 29 30 31 32 33 34 35 36 37 38 39 40 41 42 43 44 45 46 47 48 49 50 51 52 function installModule (store, rootState, path, module , hot ) { const isRoot = !path.length const namespace = store._modules .getNamespace (path) if (module .namespaced ) { if (store._modulesNamespaceMap [namespace] && __DEV__) { console .error ( `[vuex] duplicate namespace ${namespace} for the namespaced module ${path.join('/' )} ` , ) } store._modulesNamespaceMap [namespace] = module } if (!isRoot && !hot) { const parentState = getNestedState (rootState, path.slice (0 , -1 )) const moduleName = path[path.length - 1 ] store._withCommit (() => { if (__DEV__) { if (moduleName in parentState) { console .warn ( `[vuex] state field "${moduleName} " was overridden by a module with the same name at "${path.join('.' )} "` , ) } } parentState[moduleName] = module .state }) } const local = (module .context = makeLocalContext (store, namespace, path)) module .forEachMutation ((mutation, key ) => { const namespacedType = namespace + key registerMutation (store, namespacedType, mutation, local) }) module .forEachAction ((action, key ) => { const type = action.root ? key : namespace + key const handler = action.handler || action registerAction (store, type, handler, local) }) module .forEachGetter ((getter, key ) => { const namespacedType = namespace + key registerGetter (store, namespacedType, getter, local) }) module .forEachChild ((child, key ) => { installModule (store, rootState, path.concat (key), child, hot) }) }
在前面constructor中执行了installModule(this, state, [], this._modules.root)来安装模块
1 2 const isRoot = !path.length const namespace = store._modules .getNamespace (path)
先判断了是否为根模块(isRoot),以及获取这个模块的命名空间namespace
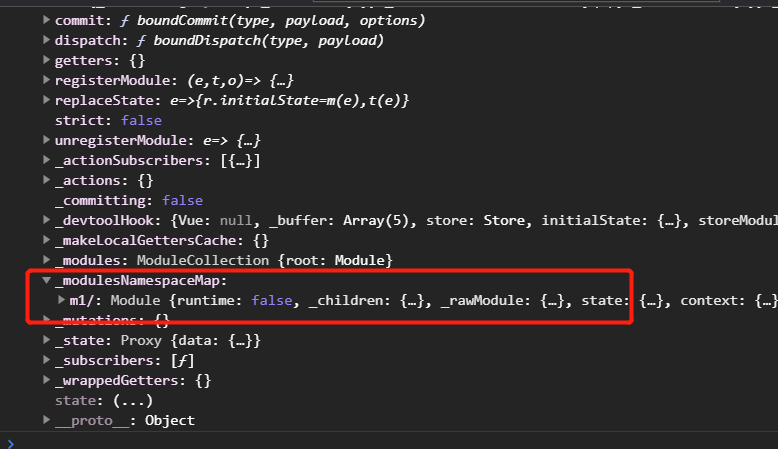
1 2 3 4 5 6 7 8 9 if (module .namespaced ) { if (store._modulesNamespaceMap [namespace] && __DEV__) { console .error ( `[vuex] duplicate namespace ${namespace} for the namespaced module ${path.join('/' )} ` , ) } store._modulesNamespaceMap [namespace] = module }
如果模块是带命名空间的(注意这里是两个东西namespaced和namespace)
那么会注册到_modulesNamespaceMap这个对象中,比如
1 2 3 4 5 6 7 const store = createStore ({ modules : { m1 : { namespaced : true , }, }, })
那么此时m1子模块在_modulesNamespaceMap中对应m1/属性
接着是一段判断
1 2 3 4 5 6 7 8 9 10 11 12 13 14 15 if (!isRoot && !hot) { const parentState = getNestedState (rootState, path.slice (0 , -1 )) const moduleName = path[path.length - 1 ] store._withCommit (() => { if (__DEV__) { if (moduleName in parentState) { console .warn ( `[vuex] state field "${moduleName} " was overridden by a module with the same name at "${path.join('.' )} "` , ) } } parentState[moduleName] = module .state }) }
这里我们先简单认为hot就是false,也就是在不是根模块 的情况下才会设置状态
那为啥根不设置状态呢,其实根的状态在constructor中由ModuleColleton对象来设置了
在constructor中this._modules = new ModuleCollection(options)初始化了根root的状态
ModuleCollection这个之后会写。
可以看到if内的实现是先通过getNestedState找到他的父状态对象
然后获取模块的名字moduleName,做了个判断,防止重名模块的出现,
最后就在父状态下挂载对应子模块的状态parentState[moduleName] = module.state,比如
1 2 3 4 5 6 7 8 9 10 11 12 const store = createStore ({ state : { val : 1 , }, modules : { m1 : { state : { val : 2 , }, }, }, })
运行这个函数之后,store.state就变成了
1 2 3 4 5 6 store.state = { val : 1 , m1 : { val : 2 , }, }
接着创建了当前模块的上下文参数,用于之后注册getters,mutations和actions
1 const local = (module .context = makeLocalContext (store, namespace, path))
接着分别遍历了当前模块的getters,mutations和actions
调用registerGetter,registerMutation和registerAction
1 2 3 4 5 6 7 8 9 10 11 12 13 14 15 16 module .forEachMutation ((mutation, key ) => { const namespacedType = namespace + key registerMutation (store, namespacedType, mutation, local) }) module .forEachAction ((action, key ) => { const type = action.root ? key : namespace + key const handler = action.handler || action registerAction (store, type, handler, local) }) module .forEachGetter ((getter, key ) => { const namespacedType = namespace + key registerGetter (store, namespacedType, getter, local) })
最后遍历模块的modules,递归的处理这个过程
1 2 3 module .forEachChild ((child, key ) => { installModule (store, rootState, path.concat (key), child, hot) })
这里可以总结出这个函数的作用,也就是把每个模块的state的状态聚合到根模块的的state上(也就是this._modules.root.state,在构造器中的语句,传入了这个函数)
注册getters,mutations,actions
这里没有发现和响应式相关的语句,因为响应式的处理在另一个函数
注意,在Vuex中,很多时候用一个path数组来表示当前模块的state
在递归注册子模块执行installModule时,传入path.concat(key),比如
如果此时模块为root,那么此时path数组为[]
如果此时root包含了一个名字为m1的模块,那么遍历到m1模块时,path数组为['m1']
resetStoreState重置store的状态,在这个函数中,会把_state变成响应式对象
并且对wrappedGetters中的getter也转为computed计算属性
1 2 3 4 5 6 7 8 9 10 11 12 13 14 15 16 17 18 19 20 21 22 23 24 25 26 27 28 29 30 31 32 33 34 35 36 37 38 39 function resetStoreState (store, state, hot ) { const oldState = store._state store.getters = {} store._makeLocalGettersCache = Object .create (null ) const wrappedGetters = store._wrappedGetters const computedObj = {} forEachValue (wrappedGetters, (fn, key ) => { computedObj[key] = partial (fn, store) Object .defineProperty (store.getters , key, { get : () => computed (() => computedObj[key]()).value , enumerable : true , }) }) store._state = reactive ({ data : state, }) if (store.strict ) { enableStrictMode (store) } if (oldState) { if (hot) { store._withCommit (() => { oldState.data = null }) } } }
先是在store上初始化getters和_makeLocalGettersCache
1 2 3 4 store.getters = {} store._makeLocalGettersCache = Object .create (null )
然后遍历了在installModule中注册的所有的getter,也就是_wrappedGetters上的所有属性
1 2 3 4 5 6 7 8 9 10 forEachValue (wrappedGetters, (fn, key ) => { computedObj[key] = partial (fn, store) Object .defineProperty (store.getters , key, { get : () => computed (() => computedObj[key]()).value , enumerable : true , }) })
注意这里利用Object.defineProperty延迟了调用computed创建一个计算属性
然后就是对state响应式化,使用Vue3的reactiveAPI来创建一个响应式对象
1 2 3 store._state = reactive ({ data : state, })
接着根据strict属性判断是否要开启严格模式,也就是是否执行enableStrictMode函数
1 2 3 4 if (store.strict ) { enableStrictMode (store) }
最后一个判断和热重载有关,忽略。
总结来说这个函数就是给已经聚合的this._modules.root.state(在构造函数中,传入了这个函数)对象设为响应式
并把_wrappedGetters上的getter设为计算属性,挂载到store.getters上
resetStore重置一个store,清除注册的所有actions,mutations,getters和模块对象
然后根据原来的state重新执行installModule和resetStoreState
1 2 3 4 5 6 7 8 9 10 11 12 function resetStore (store, hot ) { store._actions = Object .create (null ) store._mutations = Object .create (null ) store._wrappedGetters = Object .create (null ) store._modulesNamespaceMap = Object .create (null ) const state = store.state installModule (store, state, [], store._modules .root , true ) resetStoreState (store, state, hot) }
makeLocalContext可以理解为为每一个模块创建一个上下文,包括这个模块自己的dispatch和commit函数
以及挂载getters和state
1 2 3 4 5 6 7 8 9 10 11 12 13 14 15 16 17 18 19 20 21 22 23 24 25 26 27 28 29 30 31 32 33 34 35 36 37 38 39 40 41 42 43 44 45 46 47 48 49 50 51 52 53 54 55 56 function makeLocalContext (store, namespace, path ) { const noNamespace = namespace === '' const local = { dispatch : noNamespace ? store.dispatch : (_type, _payload, _options ) => { const args = unifyObjectStyle (_type, _payload, _options) const { payload, options } = args let { type } = args if (!options || !options.root ) { type = namespace + type if (__DEV__ && !store._actions [type]) { console .error (`[vuex] unknown local action type: ${args.type} , global type: ${type} ` ) return } } return store.dispatch (type, payload) }, commit : noNamespace ? store.commit : (_type, _payload, _options ) => { const args = unifyObjectStyle (_type, _payload, _options) const { payload, options } = args let { type } = args if (!options || !options.root ) { type = namespace + type if (__DEV__ && !store._mutations [type]) { console .error ( `[vuex] unknown local mutation type: ${args.type} , global type: ${type} ` , ) return } } store.commit (type, payload, options) }, } Object .defineProperties (local, { getters : { get : noNamespace ? () => store.getters : () => makeLocalGetters (store, namespace), }, state : { get : () => getNestedState (store.state , path), }, }) return local }
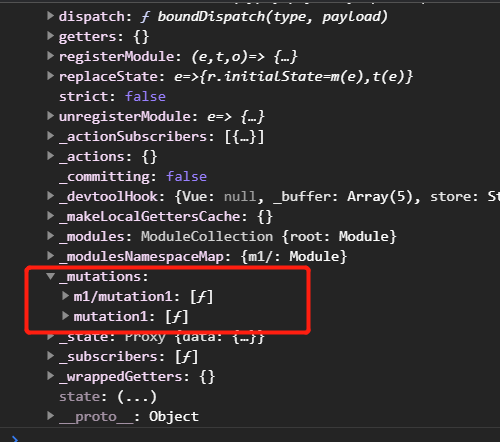
根据Vuex的文档,如果一个模块没有设置命名空间namespaced的话,
那么他的action和mutation都会直接注册到根上
也就是不同的模块可以对同一个名字注册action或者mutation
也就有了之前说的_mutations对象每个属性对应的不是单个函数,而是一个函数数组,比如
1 2 3 4 5 6 7 8 9 10 11 12 const store = createStore ({ mutations : { mutation1 ( }, modules : { m1 : { mutations : { mutation1 ( }, }, }, })
那么此时mutation1就会有两个函数,当commit的时候,这两个函数都会执行(actions同理)
而如果模块m1设置namespaced为true的话,那么m1的mutation1就会带上命名空间
1 2 3 4 5 6 7 8 9 10 11 12 const store = createStore ({ mutations : { mutation1 ( }, modules : { m1 : { mutations : { mutation1 ( }, }, }, })
那么此时m1的mutation1在根中就会带上m1/的前缀
可以以dispatch为例
1 2 3 4 5 6 7 8 9 10 11 12 13 14 15 16 17 dispatch : noNamespace ? store.dispatch : (_type, _payload, _options ) => { const args = unifyObjectStyle (_type, _payload, _options) const { payload, options } = args let { type } = args if (!options || !options.root ) { type = namespace + type if (__DEV__ && !store._actions [type]) { console .error (`[vuex] unknown local action type: ${args.type} , global type: ${type} ` ) return } } return store.dispatch (type, payload) }
存在命名空间的情况下,就是把命名空间添加到对应的action名字前,然后执行dispatch,这样就能取到对应的action
而在当前的模块下,并不需要知道真正的action名字,因为这里已经替我们处理了
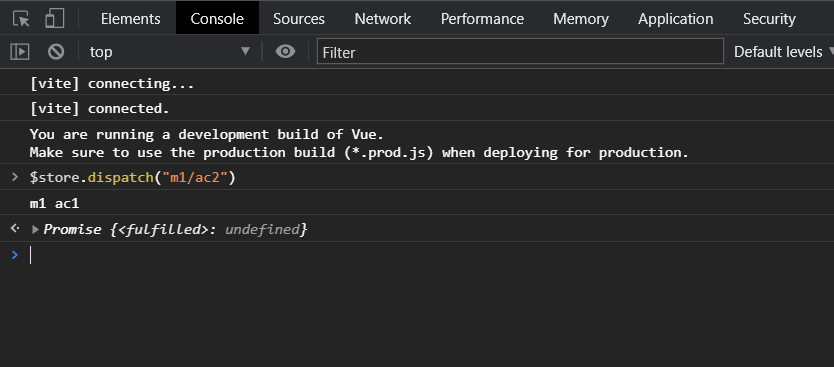
比如模块m1的ac2分发了ac1,如下
1 2 3 4 5 6 7 8 9 10 11 12 13 14 15 16 17 18 19 20 21 const store = createStore ({ actions : { ac1 ( console .log ('root ac1' ) }, }, modules : { m1 : { namespaced : true , actions : { ac1 ( console .log ('m1 ac1' ) }, ac2 ({ dispatch } ) { dispatch ('ac1' ) }, }, }, }, })
除了包装了dispatch和commit
如果存在命名空间,也会注入相应的getters和state
1 2 3 4 5 6 7 8 Object .defineProperties (local, { getters : { get : noNamespace ? () => store.getters : () => makeLocalGetters (store, namespace), }, state : { get : () => getNestedState (store.state , path), }, })
如果存在命名空间,那么会执行makeLocalGetters,根据命名空间来拿到对应的getters,
而本模块的state只要通过getNestedState来从根获取对应嵌套的state即可
makeLocalGetters通过命名空间来获取相应模块的getter,然后对结果缓存,减少计算。
1 2 3 4 5 6 7 8 9 10 11 12 13 14 15 16 17 18 19 20 21 22 23 24 function makeLocalGetters (store, namespace ) { if (!store._makeLocalGettersCache [namespace]) { const gettersProxy = {} const splitPos = namespace.length Object .keys (store.getters ).forEach ((type ) => { if (type.slice (0 , splitPos) !== namespace) return const localType = type.slice (splitPos) Object .defineProperty (gettersProxy, localType, { get : () => store.getters [type], enumerable : true , }) }) store._makeLocalGettersCache [namespace] = gettersProxy } return store._makeLocalGettersCache [namespace] }
先判断_makeLocalGettersCache是否已经缓存了结果,如果缓存了,直接返回
没有缓存的话,会把根的getters带相应命名空间的提取出来,然后缓存下来并返回。
比如此时执行了makeLocalGetters(store, "m1/")
也就是要找出m1的getter,对根getters中的每个getter
执行slice(0, namespace.length)截取getter名字的前面部分和namespace比较
相等就加入结果集,然后缓存返回,而且要注意,此时的getter已经不带命名空间了
1 2 3 4 5 6 7 8 const localType = type.slice (splitPos)Object .defineProperty (gettersProxy, localType, { get : () => store.getters [type], enumerable : true , })
registerGetter把模块的getter注册到_wrappedGetters上,
此时根据传入的local(也就是之前通过makeLocalContext创建的本模块的上下文)
做了一个函数的包装,延迟执行
1 2 3 4 5 6 7 8 9 10 11 12 13 14 15 16 17 18 function registerGetter (store, type, rawGetter, local ) { if (store._wrappedGetters [type]) { if (__DEV__) { console .error (`[vuex] duplicate getter key: ${type} ` ) } return } store._wrappedGetters [type] = function wrappedGetter (store ) { return rawGetter ( local.state , local.getters , store.state , store.getters , ) } }
registerMutation把模块的mutation注册到_mutations上
此时根据传入的local(也就是之前通过makeLocalContext创建的本模块的上下文)
做了一个函数的包装,延迟执行
1 2 3 4 5 6 7 function registerMutation (store, type, handler, local ) { const entry = store._mutations [type] || (store._mutations [type] = []) entry.push (function wrappedMutationHandler (payload ) { handler.call (store, local.state , payload) }) }
registerAction把模块的action注册到_actions属性上
action的存储方式和mutation一样,是以数组方式的,也就是一个action名字可以对应多个action的函数
这里也对action进行包装,使得它统一返回一个Promise
1 2 3 4 5 6 7 8 9 10 11 12 13 14 15 16 17 18 19 20 21 22 23 24 25 26 27 28 29 30 31 32 33 function registerAction (store, type, handler, local ) { const entry = store._actions [type] || (store._actions [type] = []) entry.push (function wrappedActionHandler (payload ) { let res = handler.call ( store, { dispatch : local.dispatch , commit : local.commit , getters : local.getters , state : local.state , rootGetters : store.getters , rootState : store.state , }, payload, ) if (!isPromise (res)) { res = Promise .resolve (res) } if (store._devtoolHook ) { return res.catch ((err ) => { store._devtoolHook .emit ('vuex:error' , err) throw err }) } else { return res } }) }
getNestedState1 2 3 function getNestedState (state, path ) { return path.reduce ((state, key ) => state[key], state) }
传入一个state和path数组,取得对应路径的状态,比如
1 2 3 4 5 6 7 8 9 10 11 const state = { a : { b : { c : { msg : 'Hello Vuex' , }, }, }, } const nestedState = getNestedState (state, ['a' , 'b' , 'c' ])
这时候nestedState就是{ msg: "Hello Vuex" }
数组的reduceAPI每次返回了下一个名字为key状态state[key],不过由于没有做判断,如果中间出现了不存在的状态那么会报错
1 2 3 4 5 getNestedState (state, ['a' , 'b' , 'd' ]) getNestedState (state, ['a' , 'd' , 'e' ])
后记 第二次写这么长的文了,可能有些地方写的比较晦涩,如果你有更好的建议可以在下面评论
除了store.js,还有几个文件需要编写,不过需要一点时间
Vuex小巧而且精致,很多时候我会惊叹里面的写法,希望我以后也能写出这么好的代码
人啊,最重要的就是开心~